The Knowledge Base
ePAY Portal: Multi-merchant Devices
All information contained in this article may be found in the document ePAY Portal: Multi-merchant Devices.
What is a Multi-merchant Terminal?
A multi-merchant terminal is a single point of sale (POS) device that is programmed with multiple terminal ID’s (TID). It’s referred to as a multi-merchant terminal because, typically, the processing TID’s are from multiple merchant accounts. An example would be:
- Hair Salon has 4 stylists that wish to have their own processing account, but all utilize the same terminal. The hair salon would also like to have a “house account” for miscellaneous payments. The terminal would be loaded with:
- House Account processing under their own MID with a unique TID.
- Stylist 1 processing under their own MID with a unique TID.
- Stylist 2 processing under their own MID with a unique TID.
- Stylist 3 processing under their own MID with a unique TID.
- Stylist 4 processing under their own MID with a unique TID.
However, there are scenarios in which a single merchant account wishes to process using multiple TID’s on 1 terminal. Since the TID is what drives the transaction with the processor, this can be achieved.
Requesting a Multi-merchant Terminal
Prior to Requesting a Terminal
It is important to ensure that this information is captured and conveyed efficiently so that the equipment is configured and deployed accurately. They should be noted when entering terminal details.
Display Name
This is the name that will appear on the terminal’s display so that the user may identify which TID the transaction should be processed under. This is typically the DBA, but an alternate may be chosen if desired or necessary. If no display name is specified, the DBA will be used by default.
Processing Password (Optional)
A password may be enabled to ensure that a transaction is not processed on the incorrect TID. This password functionality allows for each merchant to have a unique password, if desired.
Terminal Functionality Passwords (Optional)
There is the ability to enable Manager and Operator passwords, which can be used to limit access to terminal functions. The passwords for terminal functions are not unique to each merchant on the device.
Determine A Terminal’s Primary
Regardless of how many TID’s will be processing on a terminal, we will need to identify a primary MID/TID. There’s no criteria to determine which will be the primary. In selecting a primary, we identify a single account in which the equipment’s deployment work order will be created under and allow for P2PE bag registration.
The designation of primary is only in reference to the multi-merchant configuration and equipment deployment.
Setup in the ePAY Portal
The ePAY Portal is utilized when boarding a new Participant, payment type, or department. This is where the process of requesting a multi-merchant terminal and conveying the details begins.
New Terminal Request
After determining the primary account, you will need to complete the Setup tab for all the departments/payables in the ePAY Portal. For each that will be processing on the terminal, you will select, at least, “Point of sale” for question 11 on the page.

By selecting “Point of sale”, several more questions will appear. Depending on how you answer those questions will result in line items being created in the Manage Equipment tab. Since these actions are taking place prior to boarding, the Processor Terminal ID field will be blank.

Click on anywhere on the line item to enter the device details section. Ensure that the correct terminal model is selected. If not, change the model manually by selecting the correct device from the drop-down.
Primary Terminal Details
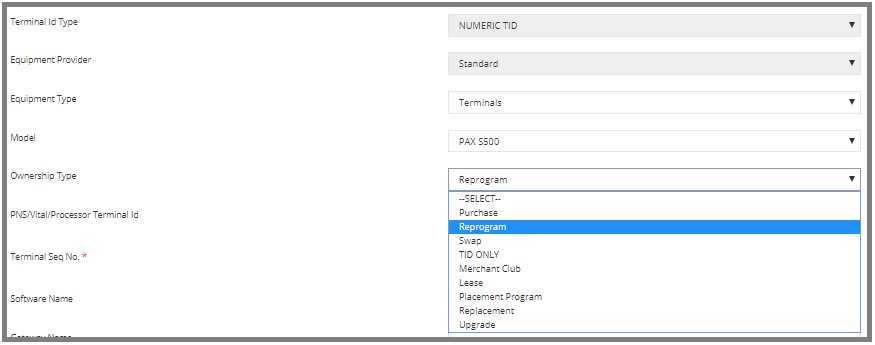
If this is the primary, then ensure that Ownership Type has “Purchase” selected. This will be important during the work order creation and terminal deployment.

Proceed to fill in any other pertinent fields, as required, until you reach the Notes field. Enter notes to convey any special instructions, as well as identify that this is the primary of a multi-merchant terminal. Below an example that identifies this as a primary and provides context as to the total number of MID/TID that will be utilizing the same terminal.

Continue scrolling down, filling out any fields that are warranted along the way, and click Save to complete.
Non-primary Terminal Details
For the non-primary applications, follow the same instructions to access the terminal details and, if necessary, correction of the device model. The Ownership Type selected for a non-primary account should be “Reprogram”. By selecting “Reprogram”, the work order created will convey that a terminal will not be deployed for this account.

Again, scroll down and proceed to fill in pertinent details, if necessary, until you reach the Notes field. Enter notes to convey any special instructions, as well as identify that this is to be included as part of a multi-merchant terminal. Below is an example of notes conveying that the account is to be included as part of a multi-merchant terminal and specifying the primary it is linked to.

Multiple TID’s Under 1 MID
The process doesn’t differ greatly if the terminal being requested is to be programmed utilizing multiple TID’s under one merchant account.
After selecting “Point-of-sale” for question 11 on the Setup tab, several more questions will appear. Under the POS section, question 1.2 asks the user to specify the number of terminals at the location. The quantity entered here results in a TID being created for each device. If you wanted a total of 3 TID’s processing on one terminal, then you would enter “3” for the quantity of terminals at the location.

The quantity entered here will then correlate to the number of line items in the Manage Equipment tab.

From here, you will need to follow the instructions above to edit the terminal details.
- Identify 1 line item as the primary and ensure Ownership Type is set as “Purchase”.
- Change Ownership Type for all non-primary line items to “Reprogram”
- Include notes for all line items.
Since all TID’s are being created under the same MID in this case, each will have the same DBA. This means that we need to include notations conveying a display name for each TID to ensure that transactions are processed under the desired TID.
Additional Communication
Since there could be several variations of combinations regarding the programming of a multi-merchant terminal, it is recommended that a spreadsheet be sent to ePAYSupport.Payments@ncr.com containing the following:
- DBA
- Display Name (If blank, DBA will be used)
- Processing Password (If blank, then none)
- Manager/Operator Passwords (per terminal – If blank, then none)
P2PE Bag Validation
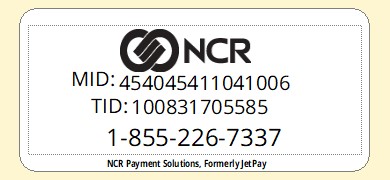
Part of the NCR P2PE terminal solution requires a bag validation process to be completed. Since only 1 terminal is being deployed, regardless of how many TID’s are included, only 1 bag number will be validated in the ePAY Portal. This validation will be done under the device line item that was identified as the primary (Ownership Type = “Purchase”). A sticker conveying the MID and TID of the primary will be placed on the device and the device box (see example below), which may be used to determine the appropriate device line item in the Manage Equipment tab.

New TID for Existing Device
If you are adding a new TID to a terminal that has already been deployed, then you may follow the same steps outlined for adding terminal details for a non-primary account.
