The Knowledge Base
ePAY Portal Users and Contact Types
All information below may also be found in the ePAY Portal Users and Contact Types Guide.
Participants can establish users of varying types within the ePAY Portal. Based on the Contact Type(s) assigned to a user, the user will receive applicable notifications, be provided access to systems outside of the ePAY Portal, and establish permissions as to what that contact may or may not change within the ePAY Portal. The Contact Types available for assignment are below, as well as their access and permission.
ePAY Portal Contact Type Table
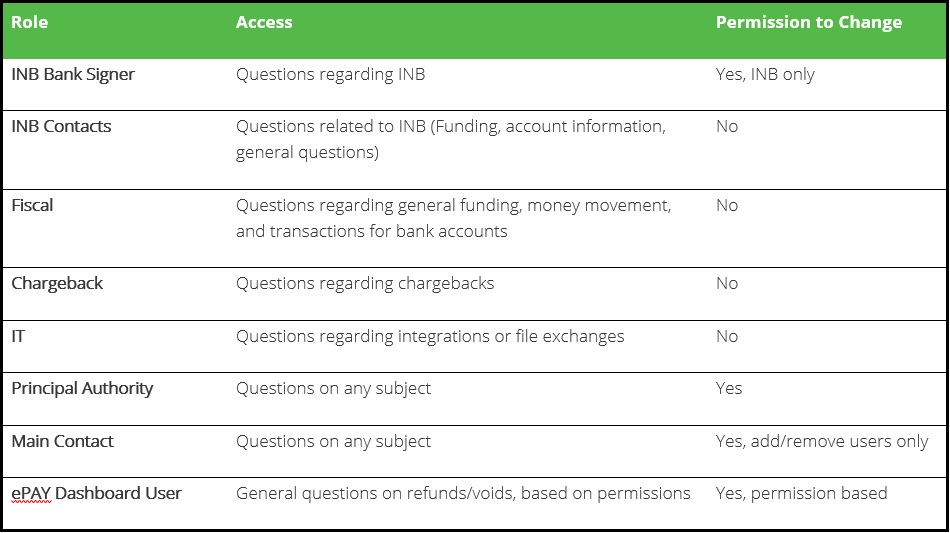
A user may have multiple Contact Types assigned, if desired.
Contact Type(s) and Notifications
In addition to the permissions listed in the table above, the Contact Type(s) assigned will determine what type of notifications the user will receive regarding announcements, service interruptions, car brand updates, upcoming maintenance, release notes, and security alerts.
Contact Type Notifications Table

Updating Users in the ePAY Portal
Prior to Adding/Updating/Deactivating a User
Before any updates are made to a Participant in the ePAY Portal regarding a user, there are actions that need to be taken to ensure that the requests being made are handled appropriately.
Principal Authority or Primary Contact
The Principal Authority and Primary Contact are important roles to the relationship with the Participant and are the only contact types that may request an update to a user. So, additional documentation is required to add/update/deactivate a Principal Authority or Primary Contact.
- Principal Authority – Must have completed and signed ePAY Principal Authority or Primary Contact Change Form, in addition to documentation confirming appointment as Principal Authroity. Documentation examples are meeting minutes or corporate/board resolution.
- Primary Contact – Must have completed and signed ePAY Principal Authority or Primary Contact Change Form, in addition to a letter on letterhead signed by the Principal Authority.
If Participant contacts CLH or NCR staff first they should be redirected to ePAY PSS Team at ePAYCustomerSupport@illinoistreasurer.gov or via a warm handoff email.
All Other Contact Types
The Principal Authority or Primary Contact should be the only two Contact Types that should be making contact addition/update/deactivation requests. If contact making request does not have the necessary permissions, the request will not be completed.
Ticket Submission
If the Principal Authority or Primary Contact are requesting a user update either The Chicago Light House or ePAY team member should open the following ticket in ticketing portal, which is routed to The Chicago Lighthouse:
- Ticket Type – ePAY Account Information/Maintenance Request
- Ticket Subtype – Update Users
All tickets must include the following:
- Name of person requesting to have a user added, updated, or disabled. Should also include that person’s contact information in the event follow-up is necessary. This should be either the Principal Authority or Primary Contact.
- First name, last name, and email address of the user being added/updated/deactivated.
- The Contact Type (INB Signer, Fiscal, Chargeback, etc.) of the contact being added/updated/deactivated.
- If Principal Authority or Primary contact, ensure that all applicable documentation is attached to the application in the ePAY Portal (Attachments tab).
- If ADDING a new user, please also include what systems contact will need access to.
- By adding a contact’s email address in the ePAY Portal, the contact will automatically be enrolled in StatusCast.
- If ePAY Dashboard access is to be granted, please specify desired ePAY Dashboard User Role and Payment Permissions.
- If UPDATING an existing user, please include what changes are being made.
- If DEACTIVATING an existing user, please specify system entities in which user should be deactivated (ePAY Portal, Dashboard, StatusCast).
How to Add a User with Contact Type(s)
To be completed by The Chicago Light House
To add contact information in the ePAY Portal, click on Online App and search for/select participant.
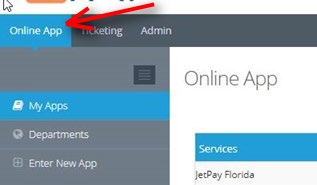
Navigate to the Users tab, select all appropriate Contact Types, and fill out the contact details that appear in the ePAY Portal. Once all fields have accurate values, click Add User.

***NOTE: This does not give contact access to the ePAY Portal. That must be established in the User Roles section. If ePAY Dashboard User is selected and all required information supplied, this will provide new contact access to Dashboard.
How to Update/Deactivate a User and Contact Type(s)
To be completed by The Chicago Light House
To update or deactivate a contact in the ePAY Portal, click on Online App and search for/select participant.

Navigate to the Users tab and identify which Contact needs to be updated. Click under the Action section for the user and you will be presented with two options for the Contact.
- Edit – Click here to keep the Contact, but just edit the Contact information.
- Deactivate – This deactivates the Contact. If done mistakenly, just click under Action again and select Activate to reactivate Contact. If deactivating a contact, ensure that all associated user profiles in Dashboard and the ePAY Portal are deactivated.
User Roles
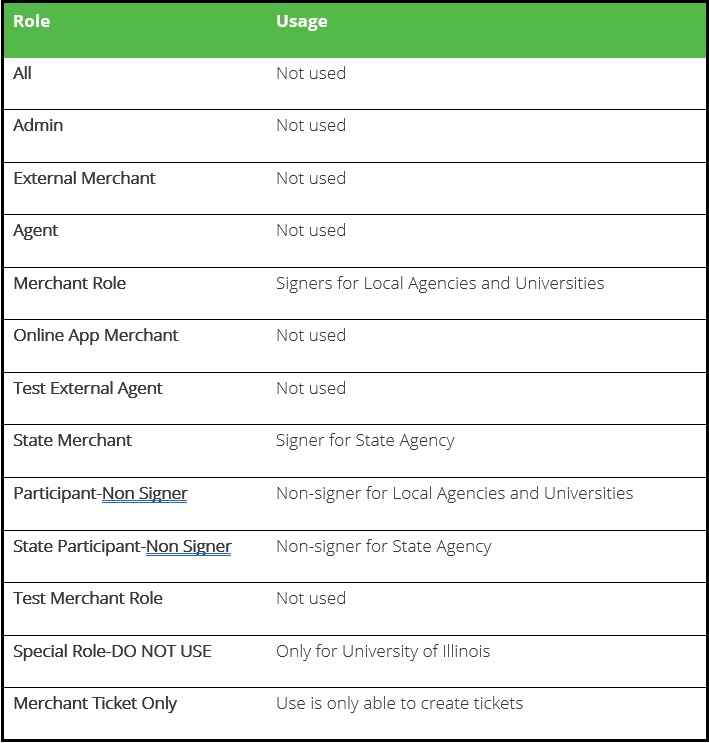
In addition to a user being added with Contact Types from the Users tab of the account, a person will need to be added as a user of the ePAY Portal, have a User Role assigned, and have specific Participant(s) associated. The User Role assigned will determine the actions permissible to the user. The actions of adding a user of the ePAY Portal, assignment of User Role, and associating specific Participant(s) take place as the result of the submission of Ticket Type ePAY Account Information/Maintenance Request, Ticket Subtype Update Users.
ePAY Portal User Role Table
How to Add a User to the ePAY Portal
To be completed by The Chicago Light House
In the ePAY Portal, click Admin from the primary navigation menu on the top-left side. You’ll then see Create User appear under the Search bar. Click Create User.

You’ll be taken to a screen requesting various information. Any field with a red asterisk (*) is required.
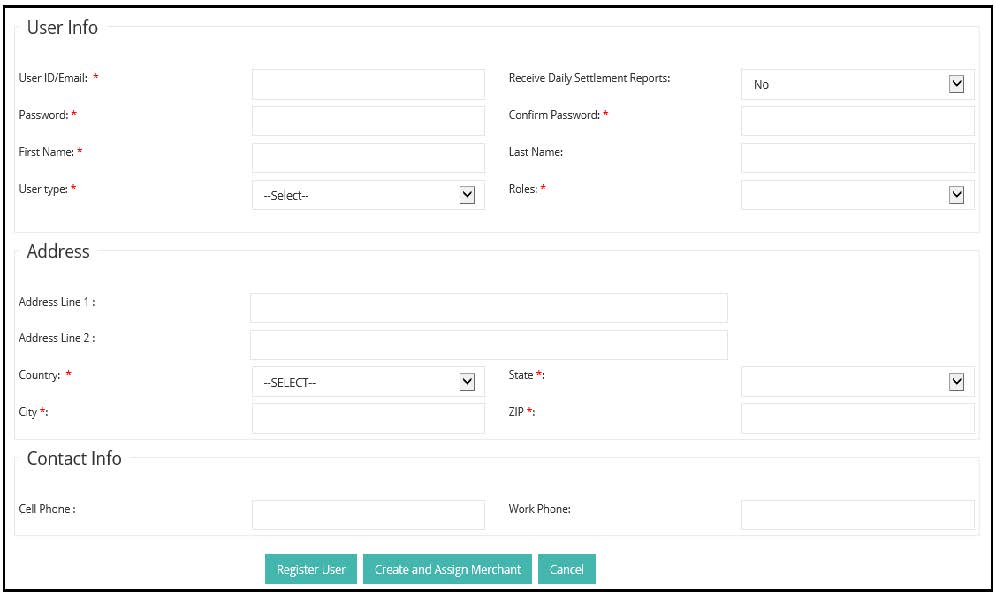
You’ll need to establish a password for the User. User may change their password after logging in or clicking “Forgot Password?” from the login screen to initiate the password reset process.
Select the appropriate User Type. For all Users associated with a Participant, you should select EXTERNAL.
Select the appropriate User Role based off either what was specified in the ticket or the user’s Contact Type.
Once you’ve entered the information required, you may proceed by selecting one of the three options at the bottom of the screen.
- Register User – This option will create the User, but they will not be able to view any Participant information.
- Create and Assign Merchant – This will create the User and you will be taken to a screen in which you will associate the User with a specific Participant or Department.
- Cancel – Cancels the process. No User information is saved or created.
The User created should need to be able to view Participant/Department information. Click Create and Assign Merchant to proceed to selecting the appropriate Participant(s)/Department(s) to associate with User.
You’ll be taken to a screen with two containers. The container on the left are accounts that are available to be assigned to the user and the container on the right are the accounts assigned to the User.
- You may utilize the search bar on the left container to more readily identify the accounts to be associated.
- The left and right arrows between the two containers are used to move a highlighted account(s) to either Unassigned or Assigned.
- Once the appropriate account(s) is identified, click on to highlight, and click the appropriate arrow to move to Assigned and click Assign Merchants.
Updating Users in ePAY Dashboard
Prior to Adding/Updating/Deactivating a User
Before making any additions or changes to users in ePAY Dashboard, ensure that the ticket requirements previously outlined have been fulfilled.
User Roles
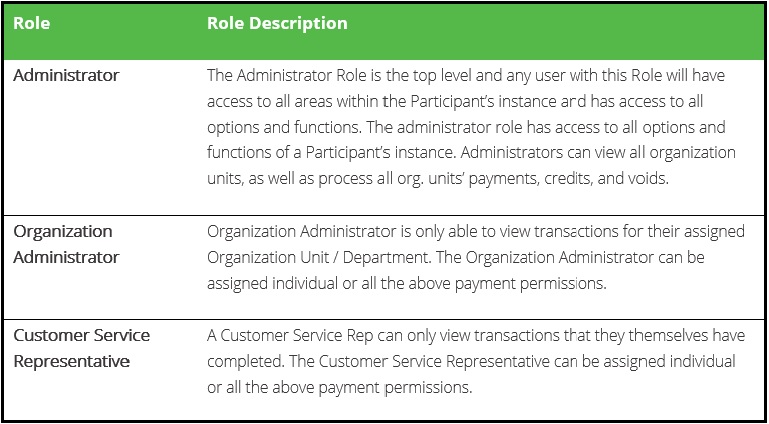
There are multiple roles within ePAY Dashboard and each provides a different level of access.
Dashboard User Role Table
Payment Permissions
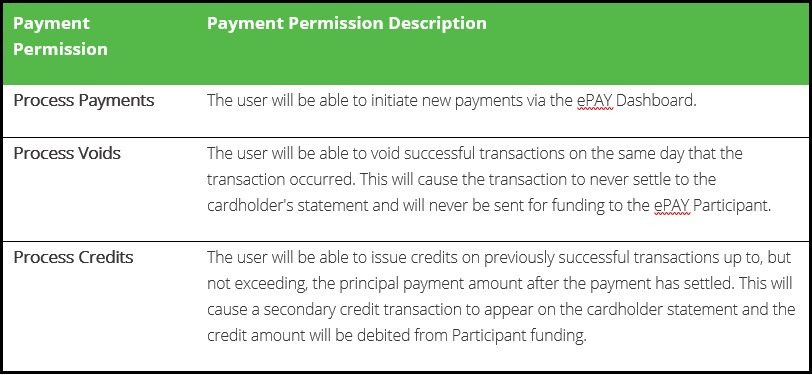
Within ePAY Dashboard a user may have multiple Payment Permissions assigned to them, allowing Participants to limit the transaction types the user is able to initiate.
Payment Permissions Table
How to Add or Update a User in ePAY Dashboard
To be completed by NCR
Once logged into Dashboard, use the Switch Client functionality to access the Participant account.
Once in the Participant account, select Office Users under the Manage function at the top of the screen.
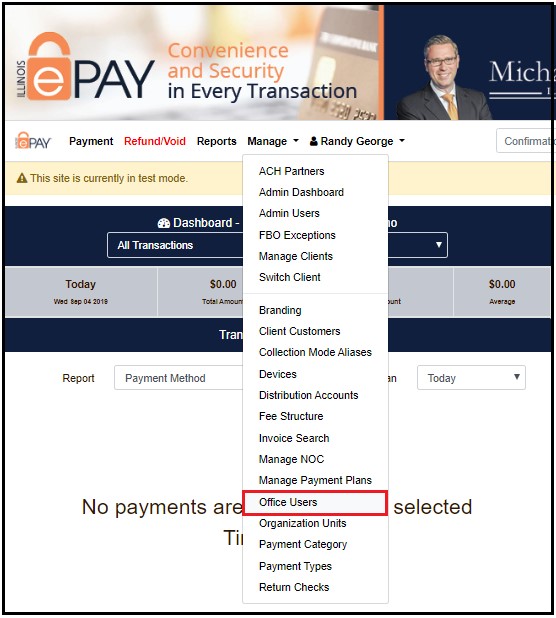
You’ll be taken to a screen containing the existing users.
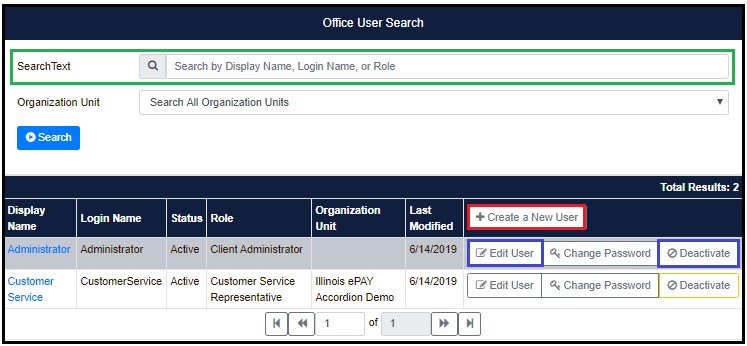
- If there are a great number of users and you need to update an existing one, there is a search bar that may be utilized to identify the desired user more quickly.
- If you are updating a user, editing information or deactivating, you will see those options in line with the user.
- If you wish to add a user, click Create a New User.
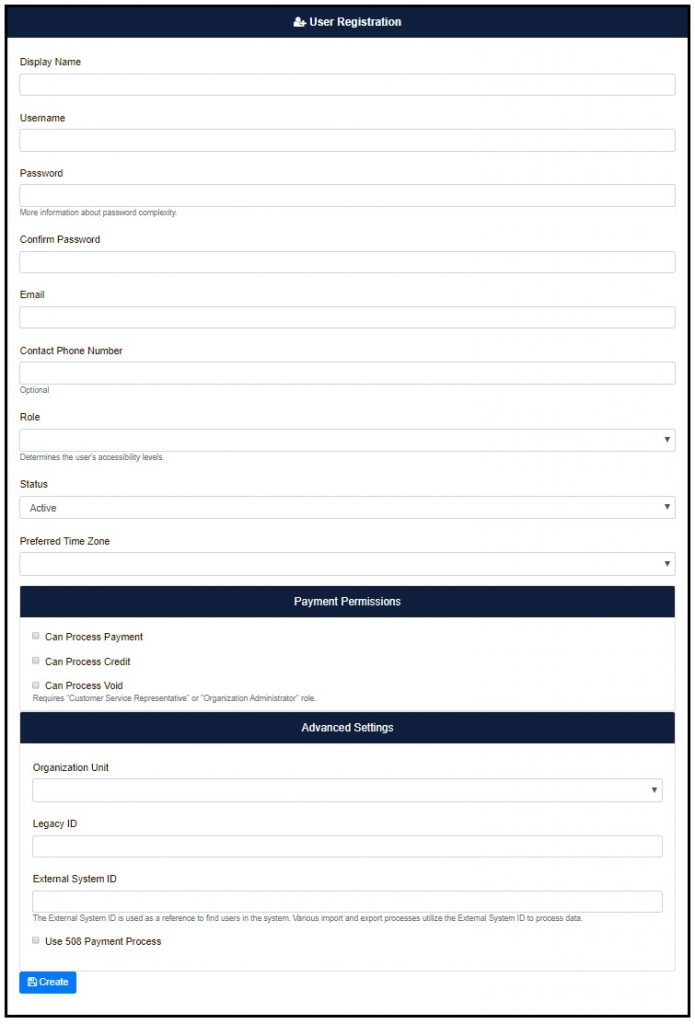
If creating a new user, you’ll be taken to the User Registration screen.
- Please fill out all applicable fields utilizing the information from the ticket submitted.
- Much like when you create a user within the ePAY Portal, you’ll need to establish the user’s password and then convey the password to the user.
Workflows
Updating Principal Authority or Primary Contact
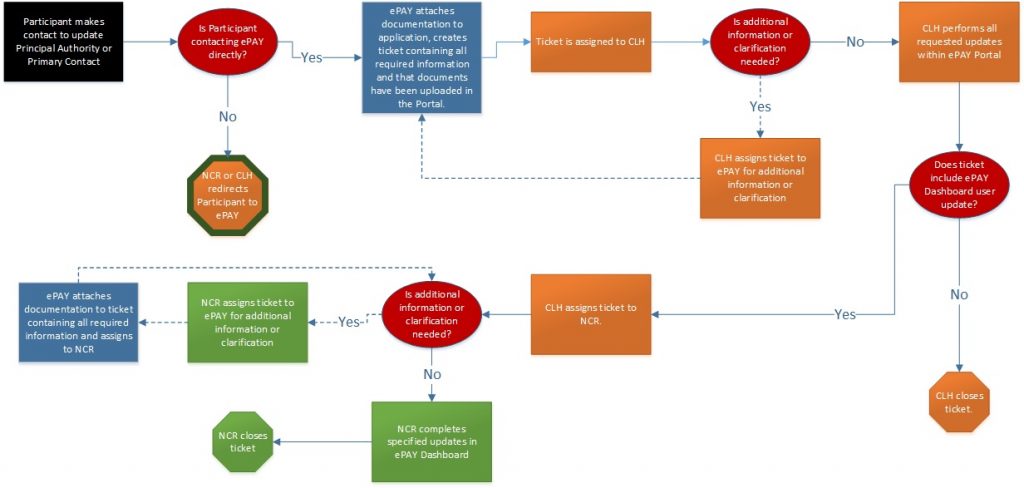
- Participant makes contact to add/update/deactivate a Principal Authority or Primary Contact.
- Is Participant contacting ePAY team directly?
- No – This means that the Participant is contacting NCR or The Chicago Light House (CLH). NCR or CLH should redirect the Participant to ePAY team.
- Yes – ePAY team will acquire required documentation, attach documents to the application in the Portal, and create a ticket stating changes needed and that the required documentation is saved in the Attachment tab. The ticket will be assigned to CLH.
- ePAY team will update the Principal/Primary in Salesforce at the account level.
- ePAY team will also update ePAY Salesforce by linking any old/previous contact to the Salesforce Generic Account.
- Is Participant contacting ePAY team directly?
- CLH will perform all updates requested within the ePAY Portal.
- Is a user to be added or updated in ePAY Dashboard?
- No – CLH closes ticket.
- Yes – CLH will assign ticket to NCR for completion of the ePAY Dashboard user update.
- NCR will update ePAY Dashboard as requested and close ticket.
- Is a user to be added or updated in ePAY Dashboard?
***NOTE: If CLH or NCR have inquiries, need additional information, or clarification regarding the request, then CLH or NCR will reassign ticket back to ePAY team until request is complete and clear.
Updating Contact Types (Not Principal Authority or Primary Contact)
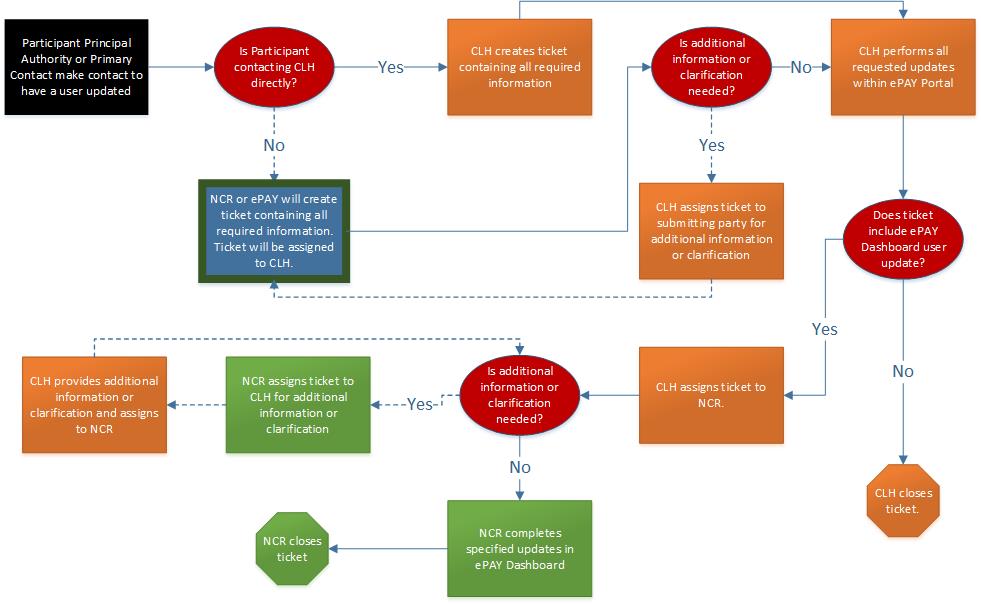
- Participant Principal Authority or Primary Contact makes contact to add/update/deactivate a user.
- Is Participant contacting CLH directly?
- No – Contacted parties from NCR or CLH to create a ticket containing all required information and ticket will be assigned to CLH.
- Yes – CLH to create ticket containing all required information.
- CLH will perform all updates requested within the ePAY Portal.
- Is a user to be added to ePAY Dashboard?
- No – CLH closes ticket.
- Yes – CLH will assign ticket to NCR for completion of the ePAY Dashboard user update.
- NCR will update ePAY Dashboard as requested and close ticket.
- Is a user to be added to ePAY Dashboard?
- Is Participant contacting CLH directly?
***NOTE: If CLH or NCR have inquiries, need additional information, or clarification regarding the request, then CLH or NCR will reassign ticket back to submitter until request is complete and clear.
